Description
The Info Manager module is a powerful custom reporting tool. It allows you to build detailed reports and filter them in a number of ways.
We will begin by breaking down the module and all of its sections.
Step-by-Step
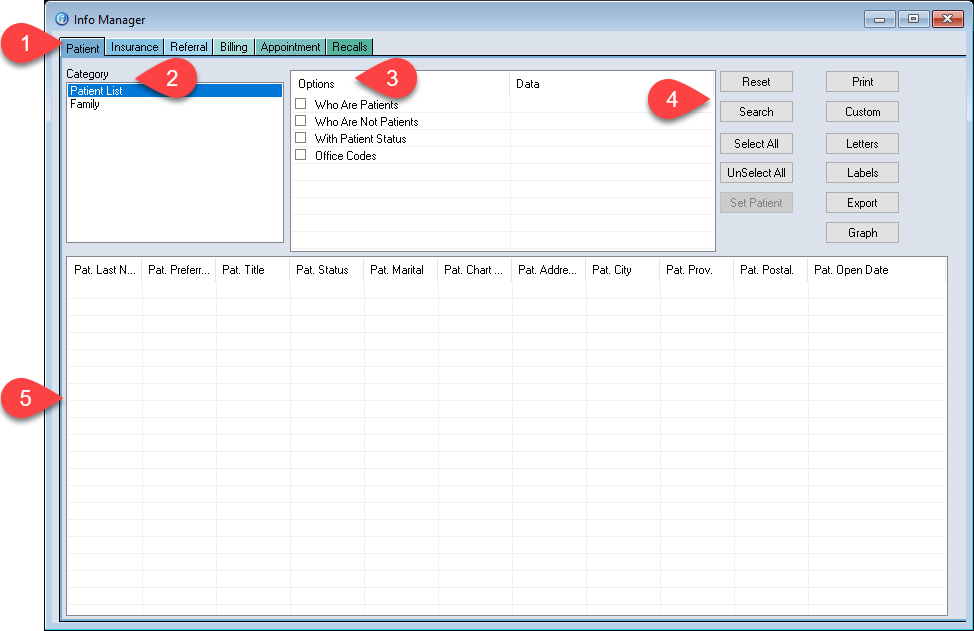
Areas of the Info Manager
- Tabs – The tabs atop the module window designate the different areas which can be reported on. The tab selection determines the general data tables/fields which will be accessible.
- Category – These are the specific fields within a given tab. These further refine the available data tables/fields accessible to the report. I.E. reports generated under the Patient Tab and Patient List category will not have access to the Adjustments data set; a field like “Adjustment Totals”, for example, would not be available in the selections for a report generated under the Patient tab.
- Options – A quick and easy list of options to choose from. These are meant to be shortcuts, not the primary condition sources for a report.
- Buttons – These buttons are used to Search, Print, and export the report.
- Report Area – The white grid area constituting the lower half the module window is the Report/Results Area. Your results will populate under their respective columns here. This is also the area from which we can access the most Editing functions using the right click menu.
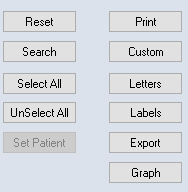
The Buttons:
- Reset – Clear search results. Conditions and settings selected will not be removed/reset.
- Print – Prints the report.
- Search – Generates the report.
- Custom – Used to Create, Save, and Edit reports you plan on reusing.
- Select All – Applies a check mark to all results.
- Letters – New Mail Merge function.
- Unselect All –Removes check mark from all results.
- Labels – Create custom labels with mail merge.
- Set Patient – Activates the patient file you have highlighted. You can then right click to navigate to other modules.
- Export – All selected/ticked results are exported to Microsoft Excel.
To access the following options, right click the search results area.
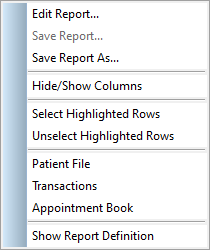
Right click Menu:
- Edit Report – Opens the report customization box. Allows a great variety of selections and control over each search field.
- Save Report – Saves the options and criteria used.
- Save Report As – Useful when altering an existing saved report. Use this feature to save the variant instead of overwriting the original.
- Select Highlighted Rows – Adds a tick mark to whichever lines are highlighted when you select this option. Very useful for selecting specific results.
- Patient File – Opens the Patient File for currently active patient file; typically used after selecting “Set Patient” button.
- Transactions – Opens the Transactions module for currently active patient file; typically used after selecting “Set Patient” button.
- Appointment Book – Opens the scheduler.
- Show Report Definition – Opens a report definition screen showing the active criteria and conditions.
Customizing the Report Fields:
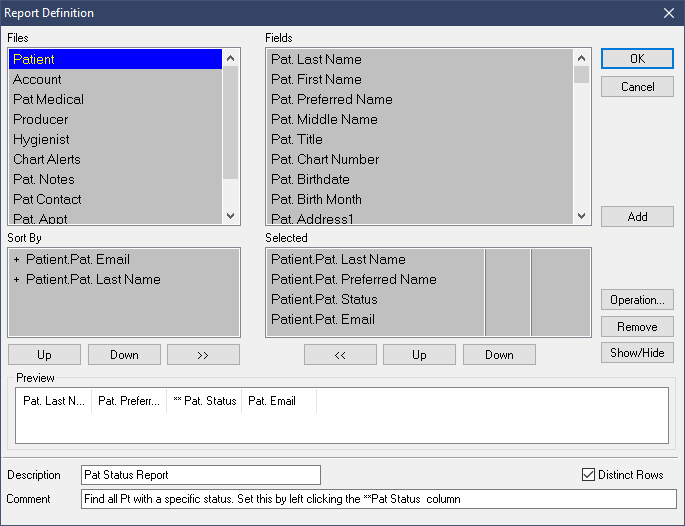
Now let’s investigate the editing options available in the Info Manager. To edit the report criteria, right click on the white grid space where the results populate and choose Edit Report. This will present the Report Definition box.
Report Definition:
- Files – The available sub-categories to search within.
- Fields – The available fields to report on. Double click or highlight then Add to move these into the active selections below.
- Sort By – Designates the sorting order. Simply use the >> / << buttons to transfer items from Selected box into sorting order or vice-versa.
- Selected – These selections constitute the columns shown on the report page, under which results will populate. These are your active report fields/selections.
- Description – Defines the name to save the report under.
- Comment – Provide a brief comment to accompany the Description.
- Distinct Rows – Ensures the program will filter out any matching/duplicate results.
Buttons:
- Ok – Confirm selections and close window.
- Cancel – Leave window without saving changes.
- Add – Relating to the Fields box to it’s left, this button adds whatever selection is highlighted to the Selected box at the bottom.
- Operation – Relating to whatever is highlighted in the Selected box, allows you to set counting functions. See section below.
- Remove – Relating to whatever is highlighted in the Selected box, remove your selection from the Active/Selected fields.
- Up/Down – Relating to whatever is highlighted in the Selected box, moves the item selected up and down the list. In the Sort By box, this determines the sorting priority. In the Selected box, it determines the order of columns.
- >>/<< – Transfers highlighted item in the direction selected. Use this to move a Selected item in to the sorting order or remove something from the sorting order entirely.

Operation box:
- Detail Operation – When using selections in this section your results will be counted in detailed groups. For example, using this detail operation on an Adjustment column will summarize each adjustment code independently. Fee Write Offs are given a total, Fee Discounts are given their own total and so on.
- Total Operation – When using selections in this section your results will be counted as a whole. For example, instead of getting a summary of each adjustment code, your report will have a total count at the end of the report instead of individuating the results like Detailed Operations.
- None – Default selection. No count operation performed.
- Count – Simple tally. Adds all results for a column into 1 total.
- Sum – Addition function. Sums up column amounts (total operation), or each code (detail operation).
- Minimum – Specifies the lowest result in a column.
- Average – Specifies the average of a column.
- Maximum – Specifies the highest result in a column
- Hide Column – Option for hiding column. Removing the column entirely may be the better option.
Note: While most searchable fields can be given a Total count, many will not include options like Sum, Average etc. These are restricted to search fields relating to numeric values. You can expect to find those operations available for Adjustments and billing related fields. You cannot use such functions on fields like “Patient Email”, for example, but you can still get a total count.
