Description
This article is a guide to add existing and new insurance policies into your patient files.
Step-by-Step
Adding a Policy That Exists in Your Power Practice
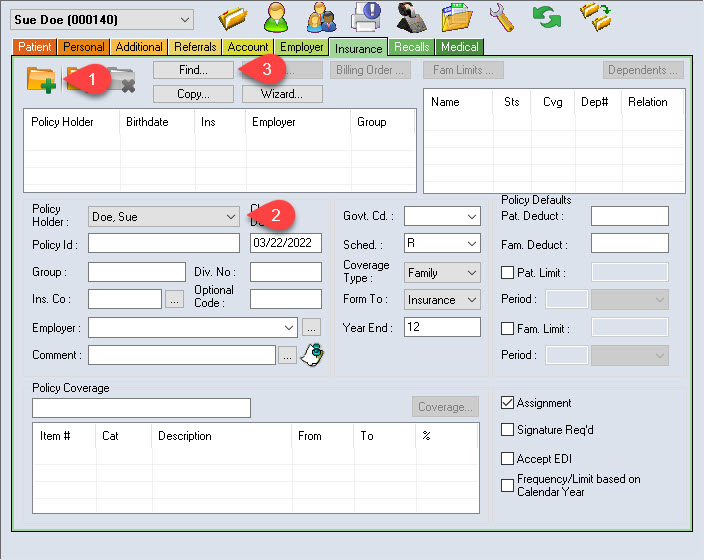
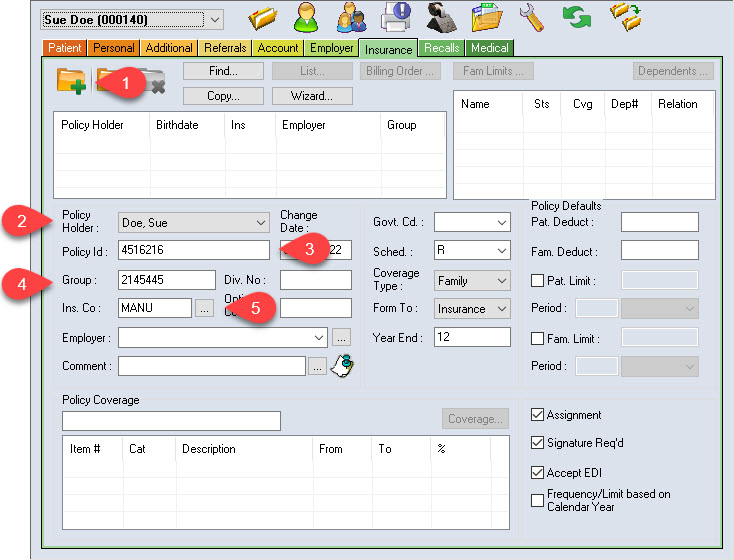
1 Select the Create Record icon.
2 Select the Policy Holder from the dropdown list.
NOTE: If the Policy Holder is not in the dropdown list, they must be added to the account prior to this step as a Policy Holder – Non-Patient. This is a patient status in Power Practice and can be selected when entering a new patient in the system.
3 Select Find.
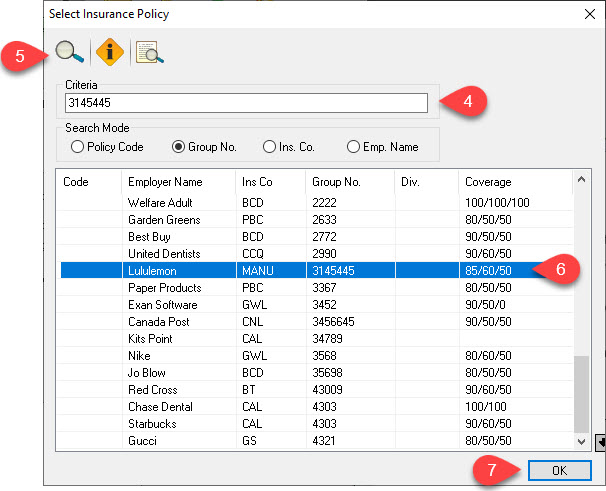
4 Set the Search Mode to Group No. and enter the group number into the Criteria field.
5 Select Search for Data icon.
If the search finds more than one policy, look at the Employer and Coverage Columns to verify which policy you want to enter.
6 Select the correct policy
7 Select OK
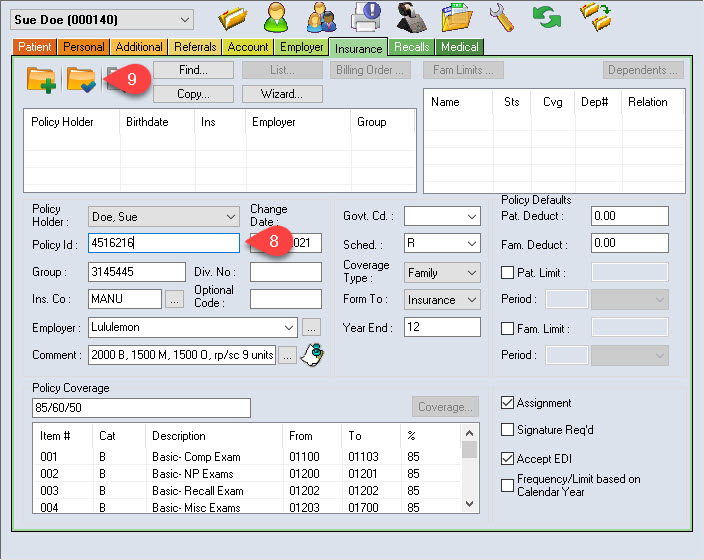
8 Enter Policy Id.
NOTE: This number is unique to the Policy Holder. It is the number that the insurance company uses to identify its members e.g., employee number.
9 Select the Save button
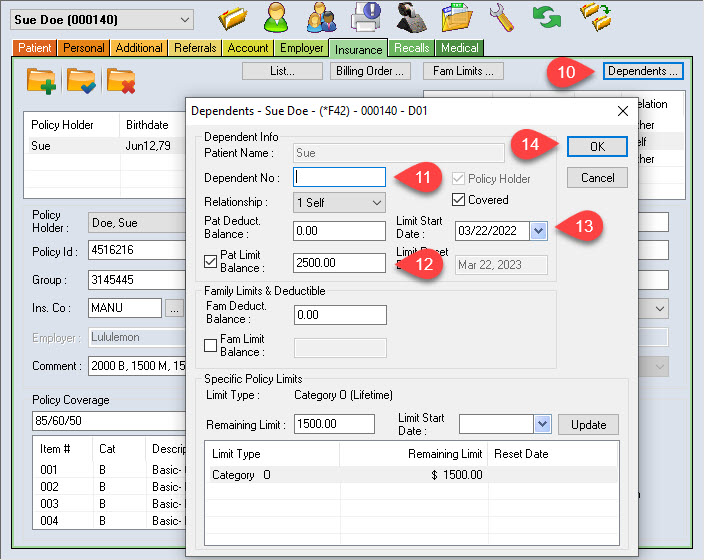
If the policy information includes Patient Limits or Category Limits you should update them to reflect the current balance
10 On the upper right, select a family member name and select the Dependents button.
11 Add or confirm Dependent No. if needed, Relationship, and if the patient is covered check the Covered checkbox
12 Place a Check in Pat Limit Balance and put in the current remaining balance.
13 Correct the Limit Start Date field(s) as they default to the current date
NOTE: If on version 5.1, the date will start cleared. The Limit Reset Date must be in the end month of the plan’s year. The limits reset with the Month End Processing. We strongly recommend using a Limit Start Date for 24-month plans such as Healthy Kids and Pharmacare YPC, but to leave it blank or remove any dates for 12-month plans. When left blank, the date boxes will be removed the next time the screen is opened.
NOTE: Deductibles and/or Limits may need adjusting if the patient has made previous claims on their policy.
14 Select OK when finished. Repeat step 10 – 14 for each family member.
Adding a Policy That Does Not Exist in Your Power Practice
1 Start a new record
2 Select the correct Policy Holder from the Policy Holder Field
3 Enter Policy Id.
NOTE: This number is unique to the Policy Holder. It is the number that the insurance company uses to identify its members e.g., employee number.
Enter the Division Number if required.
4 Enter the policy Group Number
5 Enter the insurance company by selecting the ellipses key beside the Ins. Co field, then search for the insurance company code. An easy way to do this is to type the first letter of the company name and selecting the magnifying glass.
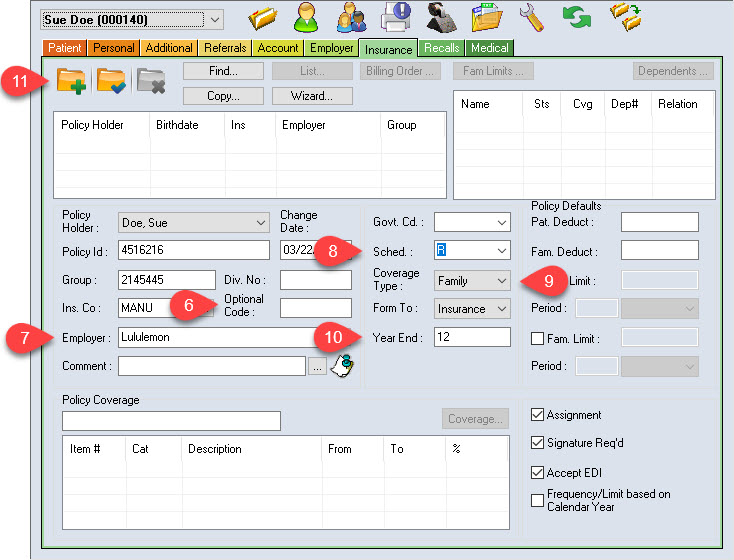
6 Enter Optional Code if specified
NOTE: This field can be used to enter additional policy identifiers that may help to differentiate unique policies that share a common group number.
7 Enter Employer name.
NOTE: Existing employer’s list is found in the ellipses button. If a different spelling is used for the same employer, then an additional employer will be created. If no employer name is known, then the Insurance company + group number can be used temporarily.
8 Select the Fee Schedule the insurance company pays from the dropdown menu. Default is set to R (Regular Current Schedule). This is the fee guide the insurance splits is determined by, not the fee the patient will be charged.
9 Confirm Coverage Type to Family (default).
NOTE: Some Insurances only cover the Policy Holder, for those policies, change the field to Patient.
10 Enter the Year End Month of the plan (Default is 12 for December).
Note: if it is a school plan where the limits reset September 1st then the Year End Month should be 8.
11 Select SAVE.
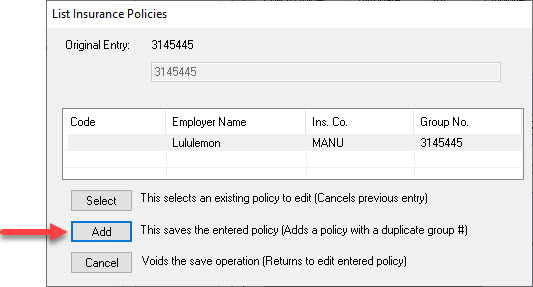
NOTE: If there are other policies with the same group number, you will be prompted to either Select/Add/Cancel. If you want this to be a brand-new policy in the system, select ADD.
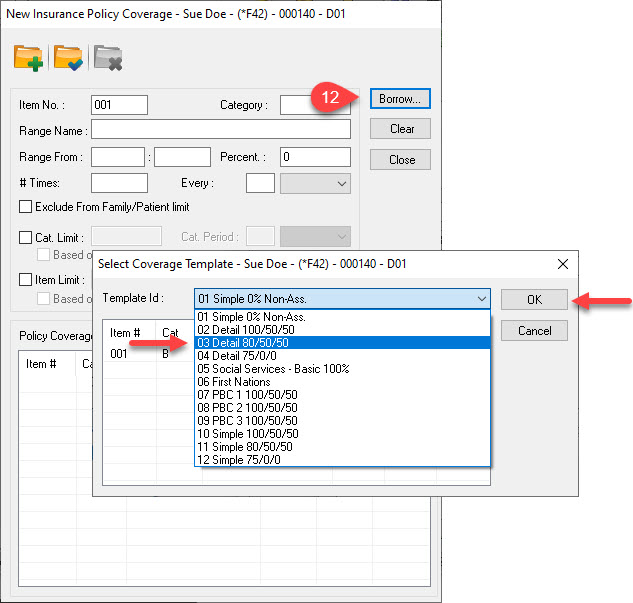
12 Select Borrow to select the Template Id from the drop-down that best matches this policy’s coverage, then select OK.
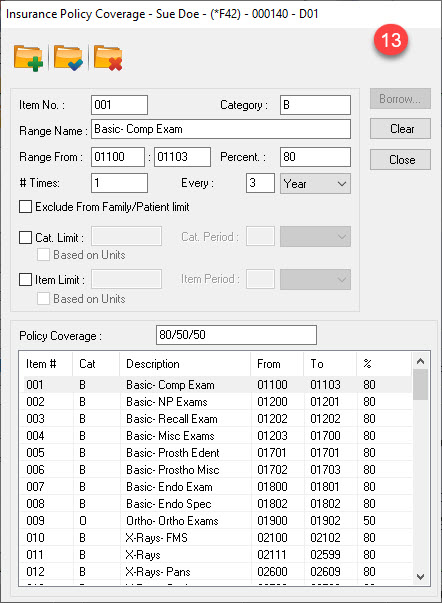
13 Update the Insurance Policy Coverage information by selecting the item at the lower half of the window and editing the information.
Item No: record number in template
Category: B Basic, M Major, O Ortho are defaults. Groups codes from multiple items into one, to allow to use the same percent or set category limits. Additional categories can be created as desired such as S for Scaling and Root Planing to procedure code ranges
Range Name: Description for codes in item.
Range From: Range of procedure codes to be linked together in the same line/item. This is used to setup frequency or limits for grouped procedure codes
Percent: Indicates the percentage covered in that category
# Times and Every (Frequency): Set the frequency the codes are covered (i.e., 1 time every 6 Months, 1 every 5 years)
Exclude From Family/Patient Limit (new in 5.1): Check this box if all items in the CATEGORY should not be counted in the Policy’s Patient or Family limit (Yearly Max), such as Ortho.
Category Limit Check for items in the Category with a total limit. Such as Ortho Lifetime Limit, Major treatment total limit different from Basic/Restorative Limit.
Item Limit Check if there is a limit that is just for the code range entered in this item. This Limit will count independently from any other limit entered.
NOTES:
Scaling 11111-11119 and Perio Scale & Root Planing 40000-43699 are listed on 2 separate items, they default into the category B. To be calculated together, the Category on each line should be changed to S and then a Category Limit added. If there is a unit limit, be sure to check the Based on Units box and enter the allowable units when the Category Limit is first setup.
If a category limit is already created and needs to be changed, un-check the boxes first and SAVE. Then add it back in correctly. After the changes are made, select SAVE and select Yes to make sure all existing policies are updated correctly. Select Close to exit the window.
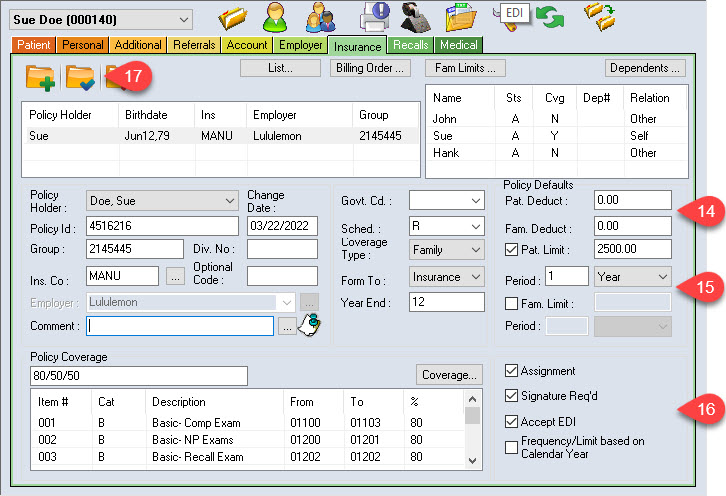
14 Enter Policy Defaults: The Patient and Family Deductible and Limits if applicable.
NOTE: Patient Deductible is the $ amount that is deducted from each patient in the family, however if there is a Family Deductible it is the maximum $ deducted regardless of the number of family members.
15 Enter Pat/Fam Limit if applicable.
NOTE: These limits refer to a combined maximum allowable regardless of the type of treatment. The roll over period can be set in months, years, or lifetime.
16 Confirm Assignment (select if you accept assignment for this policy), Signature Required (Checked on), Accept EDI (checked if setup for EDI Processing). These are defaulted by the Insurance Company selected. Frequency/Limit based on Calendar Year– Check this only if the policy frequency for recalls, exams and category limits starts over with the policy’s Year End Month. If they are Rolling Limits DO NOT CHECK.
17 Select Save.
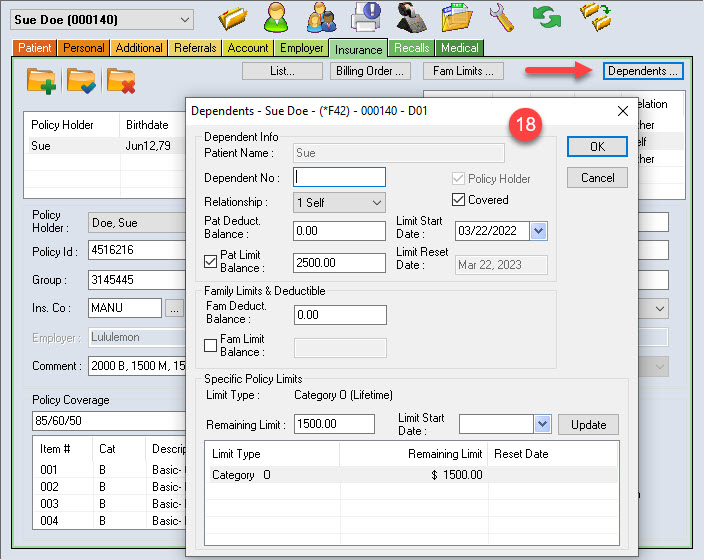
18 If the policy has Patient Limits or Category Limits, you should update them for each patient to reflect the current balance. On the upper right, select on each family member name and select the Dependents button.
Add or confirm:
Dependent No.
Relationship from the drop-down
Check Covered if patient is covered under the policy
Place a check in Pat Limit Balance and put in the current remaining balance.
Limit Start Date field(s) (If on 5.1) the date will start cleared. Only needs to be entered if the policy has a limit of 24 months. The Limit Reset Date must be in the ending month of the plan’s year. Limits reset with the Month End Processing. Recommend Start Date in the End month for 24 month plans and blank for one regular 12-month plans. When left blank the date boxes will be removed the next time the screen is opened.
NOTE: Deductibles and/or Limits may need adjusting if the patient has made previous claims on their policy.
Adding Specific Policy Limits
If the policy has Specific Policy Limits for each of the categories (Basic, Major, and/or Ortho) i.e., split maximums, you can set those limits in the Insurance Policy Coverage window.
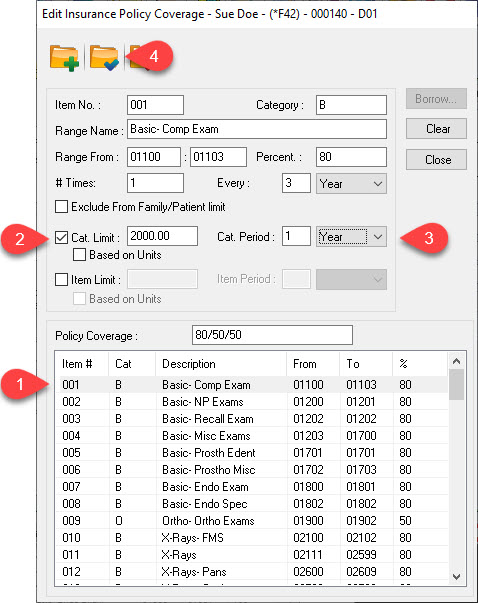
From the main insurance screen select the Coverage button.
1 Select any line with the category you would like to enter a limit for.
2 Check Limit and enter the dollar value of the category.
3 Set a period in which the limit resets in Period; set the timeline based on the policy. Add time in Year(s) for policies that reset at the beginning of the calendar year; Months for rolling polices; Lifetime is mostly reserved for Ortho limits since they usually have a set limit for the lifetime of the policy.
4 Select Save
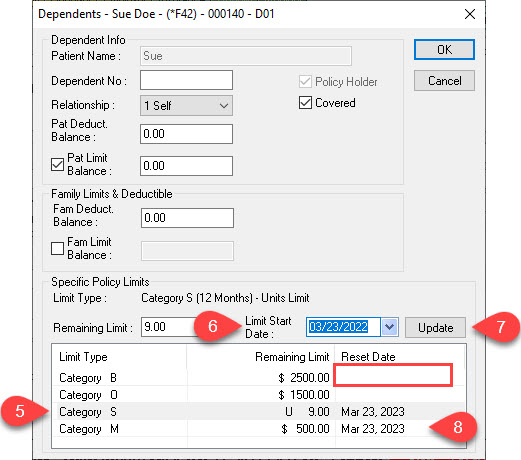
If the policy has individual category limits or if you created a custom category (e.g., Category S for Scaling and Root Planing), the Dependents screen displays the Specific Policy Limits at the bottom.
5 Select a category from the list
6 Delete the Limit Start Date
7 Select This will leave the Reset Dates blank, as indicated in the Reset Date for Category B, so they reset at the policy’s year end.
8 Repeat the steps for all categories in the list and select
