Description
version 4.8+
The Team Huddle module is designed to give you a bird’s eye view of the days ahead and help bring to attention any outstanding items.
The efficacy of this module is in retrieving and presenting relevant information for upcoming visits. It helps keep planned and incomplete items on your radar and allows your team to plan ahead for the day, week or month. It brings to attention financial information, alerts, birthdays, and so on, ensuring team cohesion. The aim is to help your team stay on top of outstanding items, improve office communication and most importantly, patient care.
This article will provide a general explanation of the module, with each distinct section explained.

Step-by-Step
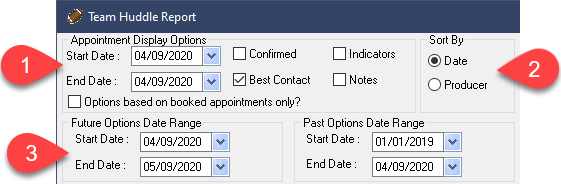
Appointment Display Options:
- Start/ End Date – Begin by designating the date range you would like to work with. You can choose to only include Confirmed appointments and a few other options using the tick boxes. You can also restrict your results to only include Booked appointments, leaving out planned and the remaining rescheduled status appointments.
- Sort By – Sort your results by Date or Producer. Sorting by Producer will keep each producer’s related results compiled together, making it easier to review a specific producer’s information.
- Future Date/Past Date – The Future and Past Date options will relate to the available selections discussed next. Simply put, designate how far into the future, and past to look for results matching the criteria.
While this is incredibly helpful for finding P or F results you may otherwise miss, it does significantly increase the report generation time and number of results. Consider doing this just once to identify and cleanup outstanding items. If you would still like to run these reports with no P/F date filters, consider using the Overnight reporting option (discussed below).
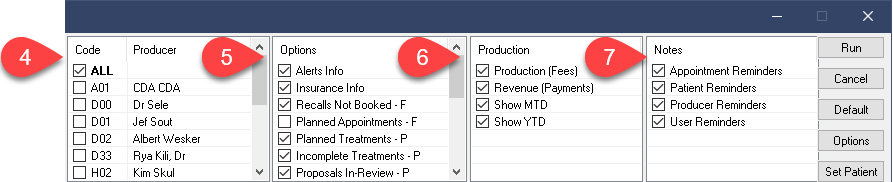
- Producer – These selections designate which Producers to include. Select your active producers here.
- Options – The Options listed determine which fields to report on. Selections made will dictate what results populate. Check off any items you may find useful. Items with a P or F letter will correspond to the Past and Future date options respectively. Items with no designation are not affected by those 2 date options and are instead related to the overall date range set in step 1.
- Production – The Production selections will provide quick information about the producer. Discussed in more detail in the Results section below.
- Notes – Select the types of notes you would like to display. The utility of each will depend directly on how often your office makes use of the given note type.
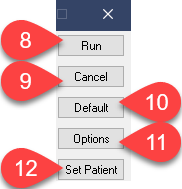
Button Selections:
- Run – Generates the report based using selections made.
- Cancel – Closes the Team Huddle module.
- Default – Set your current selections as the default. This selection is highly recommended once you’ve decided on the criteria you wish to always include.
- Options – Allows the activation of Overnight Reporting. If you find the report takes too long to generate, you can set it to run at a designated time nightly. This options requires the program is left running overnight on the reporting station.
- Set Patient – Activate the patient file of whomever is currently highlighted in the results.
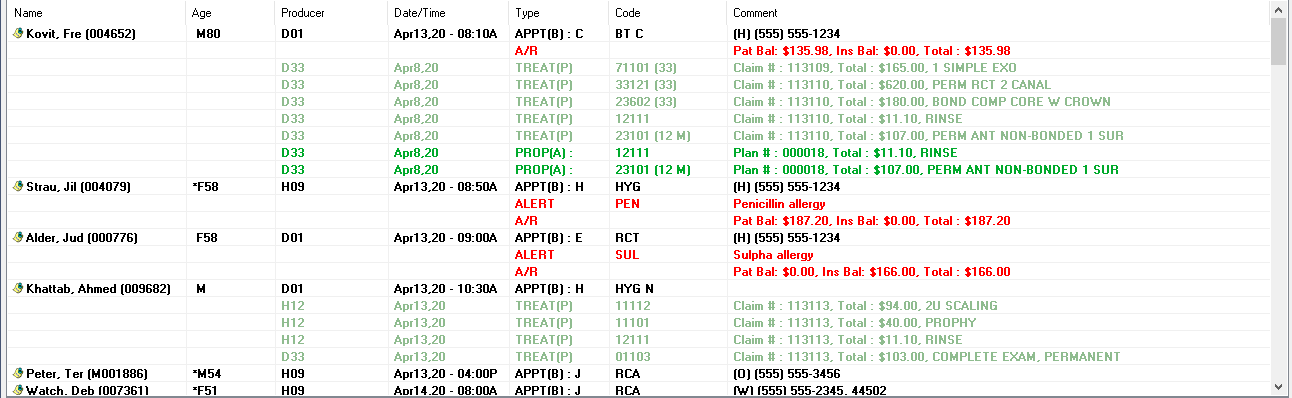
Results:
- Name – Lists the patient name.
- Age – Lists patient age.
- Producer – Lists producer associated to the result. E.g. appointments booked under D01 will show D01 as the producer, Treatments with D01 will show D01 as the producer etc.
- Date/Time – Specifies date and time.
- Type – Explains the type of result. E.g. APPT(B) = booked appointment, TREAT(P) = Planned Treatment etc.
- Code – Lists the appointment code, Allergy code, Treatment code and so on. Directly relates to Type.
- Comment – Provides details based on the Type of result. Alert abbreviations are fully spelled out, best contact listed, comment details shown and so on.

Production Results:
The production breakdown divides information into helpful categories. Number of Procedures performed, with Dental and Lab fees shown in separate columns before providing a Net Fee total. The same is done for payments, breaking down adjustments and transfers before providing a Net total.
The first line of values relates to the date range designated in step 1, while MTD represents data for the current month and YTD presents a total for the year.
Note that all right click options relate directly to the file of the patient who’s results you right clicked.
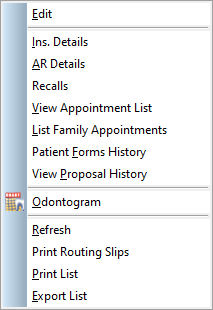
Right Click Options:
- Edit – Allows you to modify information, based on the type of result edited. I.E. Appointment lines show the Appointment Details box when edited. Recall lines present the Update Recall window and so on. Many results will not allow you to Edit them; things like Birthdays, Insurance details, A/R details and more cannot be edited from this module and must be adjusted at the source.
- Ins. Details – Presents the patient’s policy or policies for review. You cannot edit them in this window.
- AR Details – Presents the patient’s current A/R information.
- Recalls – A shortcut to the Update Recall window.
- View Appointment List – Presents all of the patient’s appointments on file. This is the same information found at the bottom of the Patient Profile tab of the Scheduler.
- List Family Appointments – Shows all appointments booked for any family members on file.
- Patient Forms History – Presents a window containing all digital forms filled by the patient (if using the digital forms functionality in Power Practice).
- View Proposal History – Presents a listing of all proposals in the patient’s history.
- Odontogram – Navigates to the Odontogram module for the patient selected.
- Refresh – Refreshes results.
- Print Routing Slip – A convenient shortcut for printing patient appointment routing slips.
- Print List – Prints the results produced. You can also print the report in full colour as of version 5.1.
- Export List – Export the results to Microsoft Excel (if bridged to Power Practice).
