There are 3 types of appointments available in the Scheduler:
- Booked
- Planned
- Recall appointment
Each type is booked differently, but they all require the correct patient file is selected so be sure to refer to your Active Patient Drop-down menu to check your active file.
Creating a Booked appointment
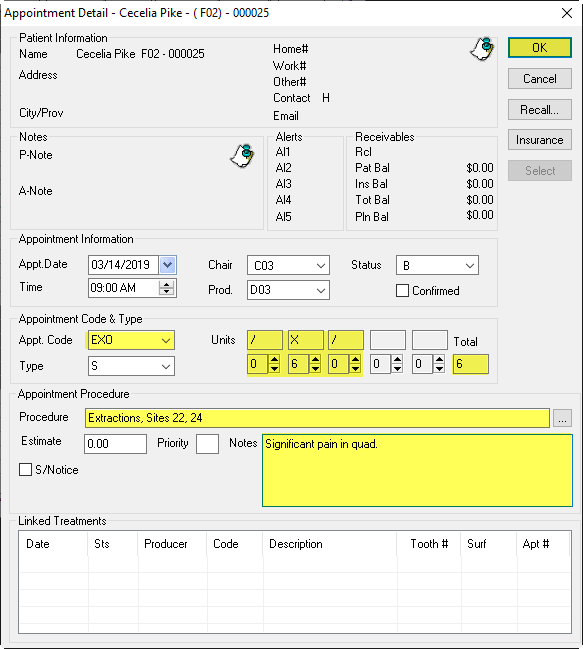
Booked appointments are the simplest type of all. They are given a set time, date and producer.
- Navigate to the Scheduler and activate the patient file
- Find a day, time and producer column that works for your patient. Double left click the time slot
- The Appointment Detail window will open
- Select the Appt. Code from the drop-down menu
Note: your cursor will be automatically placed in this field upon double clicking the time slot.
- Adjust the units of time if necessary using the up and down arrows
- Add or edit the Procedure Description as needed
- Type any additional notes
- Click Ok. The Appointment Details window will close and the appointment will now be seen on the schedule
Creating a Planned appointment
If a patient does not wish to immediately schedule an appointment, it should be planned. This allows for tracking of outstanding appointments or intended/necessary treatments for a given patient.
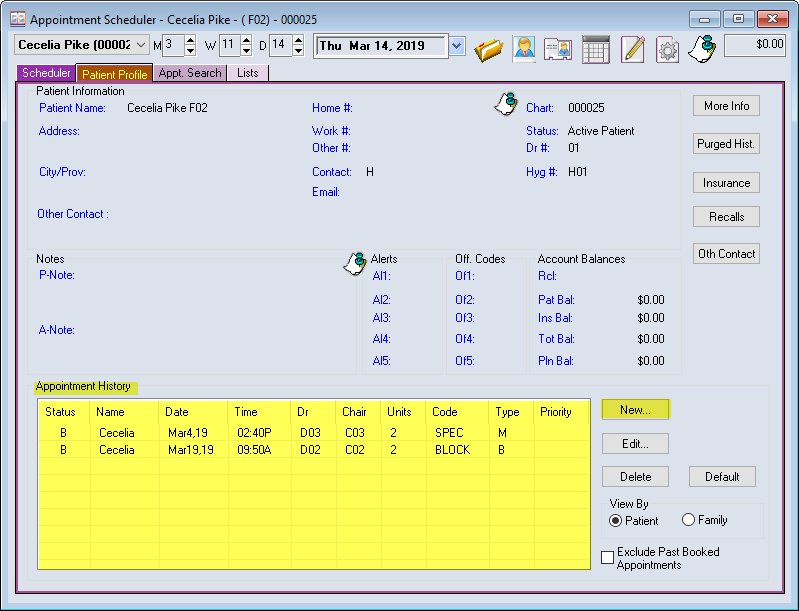
These are booked from the second tab in the Appointment Book module, the Patient Profile tab ![]()
- Open the Patient Profile tab with the correct patient active
- Click the New button (bottom right corner)
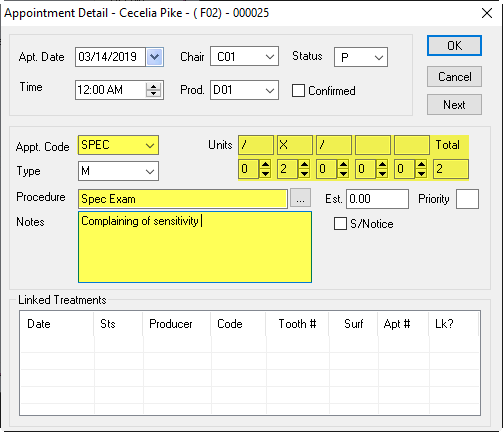
- An Appointment Details window appears
- Select the relevant Appointment Code from the drop-down menu, as before
- Adjust the units of time if necessary using the up and down arrows
- Add or edit the Procedure Description as needed
- Type any additional notes
- Click Ok.
The Appointment Details window will close and the appointment will now be visible in the Appointment History box, found at the bottom of the Patient Profile tab (pictured below).
Scheduling a Planned Appointment
When your patient is ready to schedule their planned appointment you can book it straight from the Appointment History box.
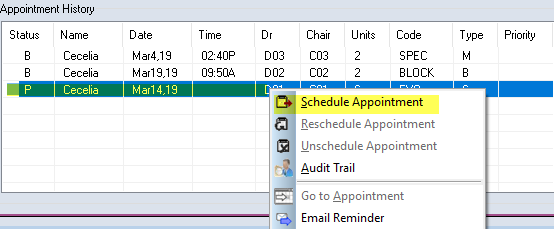
- Find the right appointment within the Appointment History box
- Highlight and right click the appointment
- Choose Schedule Appointment from the list
- The appointment will then carry over to the scheduler view
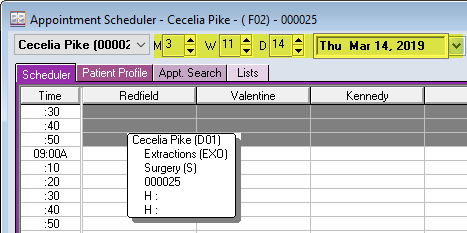
- With the appointment box floating, you can use the calendar or turn-dials to find the right date
- Once you have found a date and slot for the appointment, double left click the slot to drop in the floating appointment box
Note: You can drag the appointment box itself and double click it into position. Or you can drag it aside, find the slot and double click it to drop-in the Appointment box
- This will open the familiar Appointment Details box, but everything should already be filled in this time, so you can press Ok.
- Returning to the Appointment History box, you can see the previously P status appointment is now a B status, for booked. There are also a time and date associated with it now.
Recall Appointments
When a recall code is activated on a patient’s file, a red Recall line is automatically created in the Appointment history. This Recall line denotes the due date for a patient to return for a cleaning appointment.
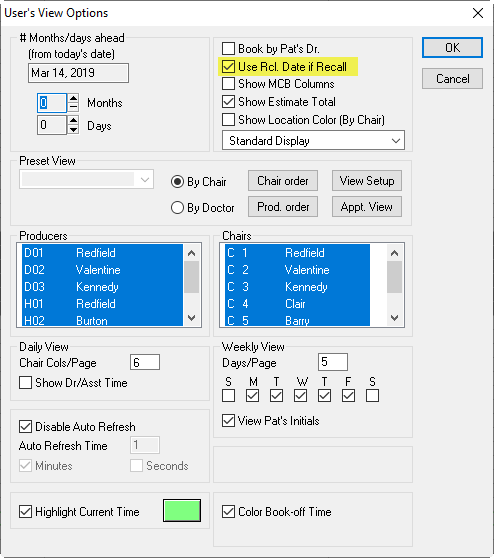
Note: If you would like Power Practice to jump to the first available Recall date, visit the Appointment Book module and select the User View Options icon ![]() .
.
Tick the Use Recall Date if Recall option and press ok.
Booking a Recall Appointment
If the patient has a Recall Code active on their account, you can follow the steps below to schedule their Recall.

- Open the Patient Profile tab with the correct patient selected
- In the Appointment History box, highlight the red Recall line and right click it.
- Select Schedule Appointment
- The appointment will carry over to the scheduler, and the first available date if Use Recall Date if Recall is active
- As before, the floating appointment box can be dragged manually or left aside and dropped in by double left clicking an available time slot
- The Appointment Detail box will pop-up, choose the appropriate Appointment Code, fill in any necessary details and press Ok.
- Returning to the Appointment History box, you will no longer see a red line, but rather a red arrow, directly beneath the booked appointment.
The Recall line will remain attached to the Booked appointment line until the Recall is updated.


