Adding a New Policy not in Power Practice
If you did not find the group number in your system, you will need to build the policy yourself. Your ability to do so may be hindered by a lack of information, so ask your patient to contact their insurer and provide as many coverage details as they can to better describe their expected coverage and limits.
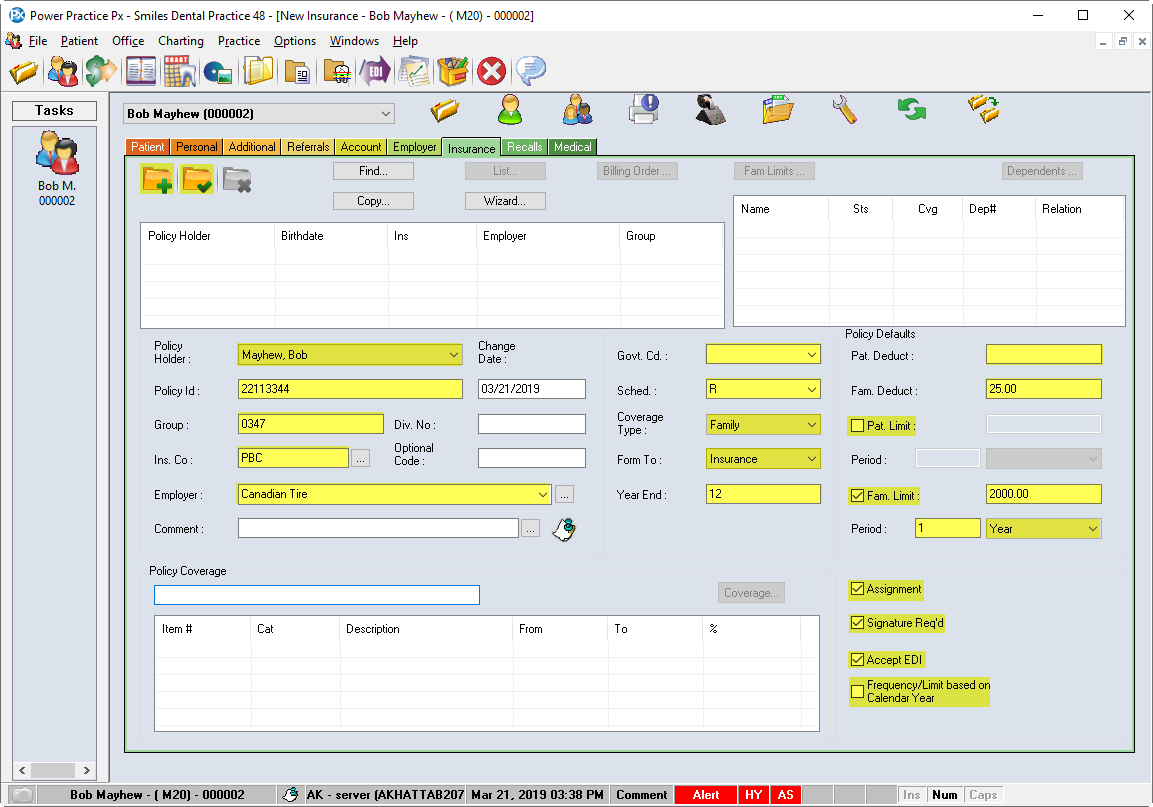
- Check the Policy Holder field for the correct name. Choose from the drop-down list if needed.
- Enter the Policy ID and Group Number (and Div No. if required)
- Enter Ins. Co. (insurance company) code
Note: Every Insurance Company has been assigned a code that can be searched for in the ellipses
 button
 - Enter Optional Code if desired
Note: This field can be used to enter additional policy identifiers that may help to differentiate unique policies that share a common group number
- Enter Employer name
Note: Existing employer’s list is found in the ellipses button. If a different spelling is used for the same employer, an additional employer will be created. You must include an Employer name to create a policy.
- Leave the Gov’t Code field blank. This was formerly used by Insurance to indicate protected status groups. Instead, use the Schedule field below
- Choose the Fee Schedule in the Sched. field that the insurance company pays on from the drop-down menu (Default is set to R, Regular Current Schedule)
- Confirm Coverage Type (Family is default)
Note:Some Insurances only cover the Policy Holder, Coverage Type would then be Patient
- Enter the Year End of the plan (Default is 12, December)
- Enter Pat. Deductible if applicable
Note: Patient Deductible is the dollar amount that is deducted from each patient in the family, however, if there is a Family Deductible, it is the maximum amount deducted regardless of the number of family members
- Enter Pat Limit/Fam Limit if applicable
Note: These limits refer to a combined maximum allowable for the policy regardless of the type of treatment. The roll-ver period can be set in months, years or lifetime
- Confirm Assignment, Signature Required, and Accept EDI. These are defaulted by the insurance company selected
Note: The Frequency/Limit Based on Calendar Year tick box is best left unchecked. Use the Year End box to indicate the reset month instead
- Click the Save Record icon. The Policy Coverage Box opens. Click Borrow and choose a Detail template
- Click on the drop-down arrow and select the closest Detail template to the policy coverage(unless better option available, e.g. Social Services). Select the Ok button
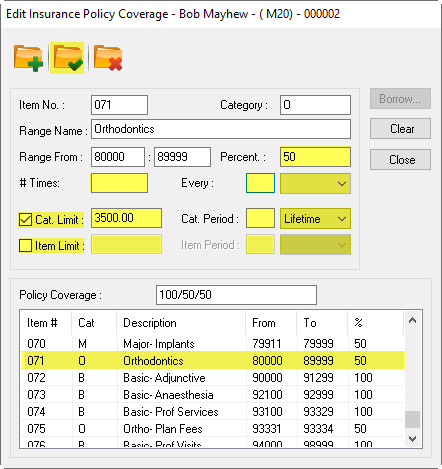
- Adjust the Coverage Template according to the parameters of the policy, as demonstrated above
Note: % adjustments can be made for a single range line (item#) or for the category (B,M, and O). Simply find a category item, highlight the item line. Go to the % field, enter the new percentage and save. When prompted by Power Practice, choose to apply this % change to either all category items or just this one.
You can also set a Category Limit or Item Limit. The former sets a restriction on all category items, the latter affects only the line item highlighted. Use the period ranges to specify the reset frequency
- Save each change made. An Insurance Policy Coverage window will appear. Select Yes to affect every range item in the category, or No to adjust the single line
- Select Close once all adjustments are made within the Edit Insurance Policy Coverage window
- Enter the breakdown/overview of the plan in the Comments box
- Highlight the dependent (upper right box) and select the Dependent button (or double left click name).
- Add or confirm Dependent No., Relationship and if the dependent is Covered. do this step for each dependent. Limit Start Date field(s) can be cleared unless roll over is longer than 12 months/1 year
- Click Ok.
